

Tired of the same old generic ringtones? Want to personalize your Android experience and make your phone truly your own? This step-by-step guide provides comprehensive instructions on how to customize your Android ringtone with custom sounds, from choosing your favorite music to setting different ringtones for specific contacts. Learn how to easily set a custom ringtone on your Android device, regardless of manufacturer or Android version. Whether you want to use a downloaded MP3, an amusing sound effect, or a snippet of your favorite song, this guide will show you how.
Personalizing your Android ringtone is a simple yet effective way to add a touch of individuality to your device. This guide will walk you through the process of selecting and setting custom ringtones, allowing you to express yourself with every incoming call. From navigating your file system to using built-in Android features, we’ll cover every aspect of ringtone customization. Start creating a truly personalized auditory experience on your Android phone today and stand out from the crowd with your unique sounds.
Exploring Ringtone Options on Your Android Device
Before diving into customization, familiarize yourself with the built-in ringtone options available on your Android device. Most Android phones offer a curated selection of pre-installed ringtones. These can be a quick and easy way to personalize your device without needing to create custom sounds.
To access these pre-installed options, navigate to your device’s Settings menu, typically represented by a gear icon. From there, locate and select Sound & vibration (or a similarly named option depending on your Android version and manufacturer). Within this menu, you will find the Ringtone option. Tap on it to browse the available sounds. The specific layout and naming conventions might vary slightly based on your device and Android version, but the general principle remains consistent.
Take some time to explore the different categories and listen to the various pre-loaded ringtones. You might find one that perfectly suits your preferences without needing further customization. Pay attention to the default ringtone currently selected, as this is the sound that will play for incoming calls unless you change it. Understanding these pre-existing options is a good first step before exploring custom ringtone creation.
Choosing Your Custom Ringtone Source: Music, Downloads, or Recordings
Once you’ve decided to personalize your ringtone, the next step is selecting the audio source. Android offers flexibility in choosing where your custom ringtone comes from. The most common sources include your existing music library, downloaded audio files, and even your own recordings.
Music Library: If you have music stored on your device, it’s a readily available source for ringtones. Simply navigate to your music player or file manager to select a track.
Downloads: Audio files downloaded from the internet, such as sound effects or short music clips, can also be used. These are typically found in your device’s “Downloads” folder.
Recordings: For a truly unique ringtone, consider creating your own recording. Use your device’s built-in voice recorder or a third-party audio recording app to capture sounds, music, or even personalized voice messages.
Setting a Custom Ringtone Through System Settings
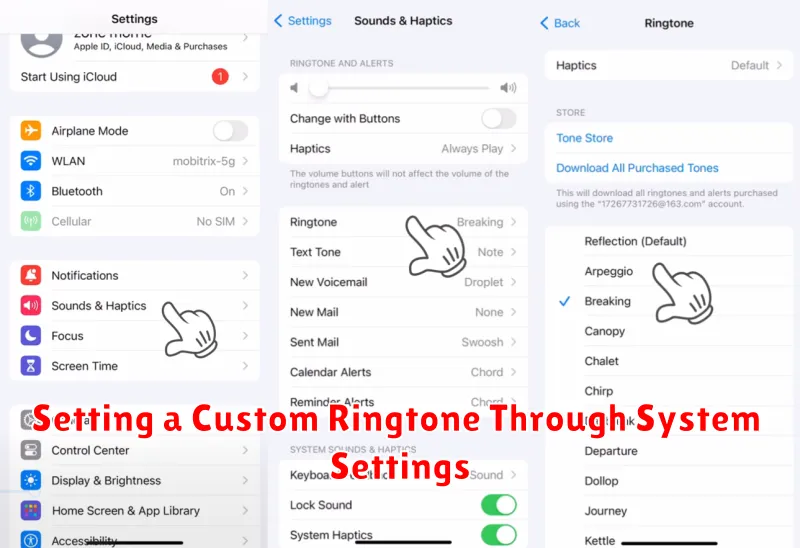
Most Android devices allow you to set custom ringtones directly through the system settings. This method is generally straightforward and doesn’t require any additional apps.
Start by opening the Settings app on your device. Locate and select Sound & vibration (or a similarly named option; the exact wording may vary depending on your Android version and device manufacturer). Within this menu, you’ll typically find an option labeled Ringtone or Phone ringtone.
Tapping on this option will present you with a list of pre-installed ringtones. To use a custom sound, look for a “+” button, a file explorer icon, or an option labeled Add or Select from files. This will allow you to browse your device’s storage for compatible audio files (typically MP3 or other common formats).
Once you’ve located your desired audio file, select it. The system will usually play a short preview. If satisfied, confirm your selection, and the chosen sound will be set as your new ringtone.
Using Third-Party Apps for Ringtone Management
While Android offers built-in ringtone customization, third-party apps from the Google Play Store provide extended features and streamlined processes.
These apps often offer larger music libraries, advanced editing tools, and easier ringtone assignment.
Key benefits of using a third-party app:
- Wider Selection: Access to online music libraries and sound effects.
- Precise Editing: Trim and adjust audio files with greater precision.
- Simplified Assignment: Directly set ringtones within the app.
- Specialized Features: Some apps offer features like fade-in/out effects, ringtone creation from recordings, and more.
Choosing an App: When selecting a ringtone app, consider factors like user reviews, available features, and any associated costs. Some popular options include Ringtone Maker, ZEDGE, and Audiko.
Installation and Use: Once installed, follow the in-app instructions, which generally involve selecting an audio file, editing it as needed, and then setting it as your ringtone.
Assigning Ringtones to Specific Contacts
Personalizing ringtones for individual contacts allows you to easily identify who’s calling without looking at your phone. This feature is especially useful for distinguishing between important calls, such as family or work contacts, from general calls.
The process typically involves navigating to your contacts app, selecting the desired contact, and then finding the ringtone option within their details. Locate the “Edit” or “Details” button for the contact. Within the contact’s information, you’ll usually find a designated field or option for setting a ringtone. Select your preferred custom ringtone from the available list. This list usually includes your system sounds, pre-loaded ringtones, and any custom ringtones you’ve added.
Remember to save the changes after assigning the ringtone to ensure the personalization takes effect. Now, whenever that specific contact calls, their assigned ringtone will play.
Troubleshooting Ringtone Issues
Occasionally, you might encounter issues with setting or hearing your custom ringtone. Here’s a guide to resolving common problems:
Ringtone Not Showing Up
If your custom ringtone doesn’t appear in the ringtone picker, ensure it’s saved in the correct location. Ringtones should be in the “Ringtones” folder on your device’s internal storage or SD card. Restarting your device can sometimes resolve this issue.
Ringtone Volume Too Low
Check the ringtone volume setting. It’s separate from the overall system volume. Also, ensure the audio file itself isn’t too quiet. You might need to increase its volume using an audio editing app.
Specific Contact Ringtone Not Working
Confirm that you’ve correctly assigned the custom ringtone to the desired contact. Sometimes, third-party contact apps might interfere with this process. Try setting the ringtone using the default Contacts app.
Ringtone File Corrupted
If the ringtone file is corrupt, it may not play properly. Try redownloading or recreating the ringtone to ensure a clean copy.
Creating Your Own Ringtones with Audio Editing Software
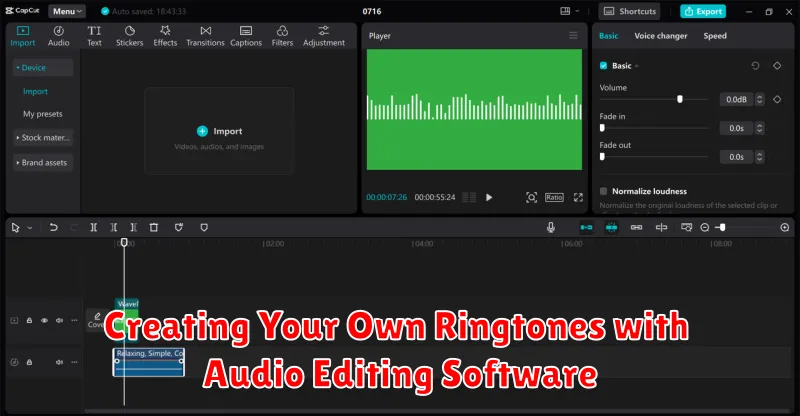
Crafting personalized ringtones offers a unique touch to your Android device. Using audio editing software unlocks a world of possibilities, allowing you to transform music files or recordings into custom ringtones.
Choose your audio source. This could be your favorite song, a sound effect, or even a voice recording. Ensure you have the necessary rights to use the audio.
Select an audio editor. Numerous free and paid audio editing applications are available for desktop and mobile devices. Audacity, for instance, is a popular free option. Paid software often provides advanced features.
Import and edit. Import your chosen audio into the editor. Isolate the desired segment for your ringtone, typically around 30 seconds. Precise editing is key for a polished result.
Export in the correct format. Android supports MP3, so export your edited clip as an MP3 file. Ensure the file size isn’t excessively large.